BOOK 01/30Getting started
Sign in & work modes
How to sign in with the shop owner's email or a staff PIN, pick a work mode after the PIN, switch modes while working, and sign out or switch person when someone else takes the device.
Signing in
Shop owner: log in with email
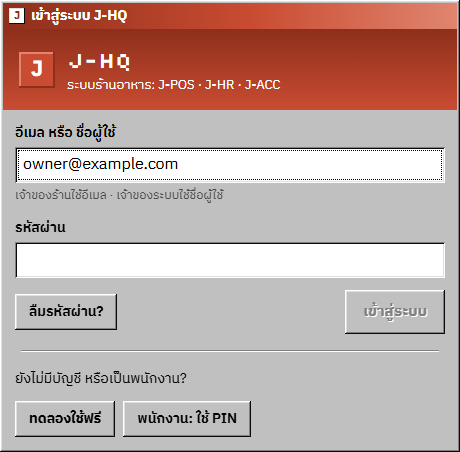
On “Log in to J-HQ”, enter “Email or username” (shop owners use the email they signed up with) and “Password”, then press “Log in”. You land on the shop Overview (the Office).
An email login pairs that browser with the shop (remembered for 365 days). After that, staff can use their PIN on this device.
Open full size Forgot password, and verifying the email
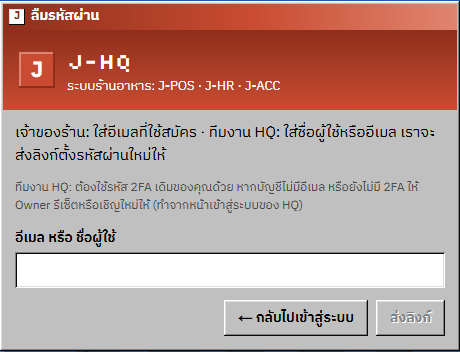
Press “Forgot password?”, enter the email you signed up with and press “Send the link”. The link works for 2 hours; open it and set a new password of at least 10 characters.
If the email isn't verified yet, the login page offers “Send the verification link again”. After you open the link you see “Email verified. You can log in now.”
Open full size Staff: sign in with a 4-digit PIN
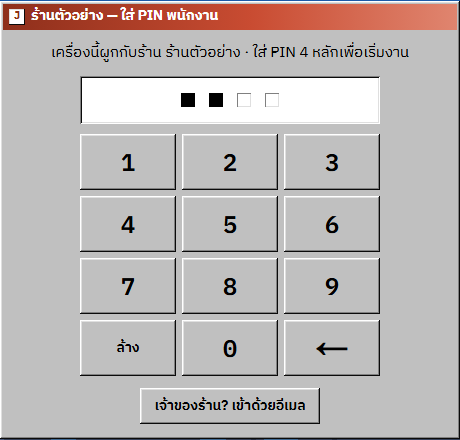
On a paired device the login page opens on the “<shop> — staff PIN” pad. Type the 4-digit PIN; it signs in as soon as the 4th digit is entered, with no Confirm button.
If the page opens on the email form, press “Staff: use a PIN”. A wrong PIN shows “Wrong PIN, or the staff account is off.” and clears the pad. The owner can press “Shop owner? Log in with email” from the PIN pad.
Open full size
Choosing a work mode
The “Choose a work mode” screen
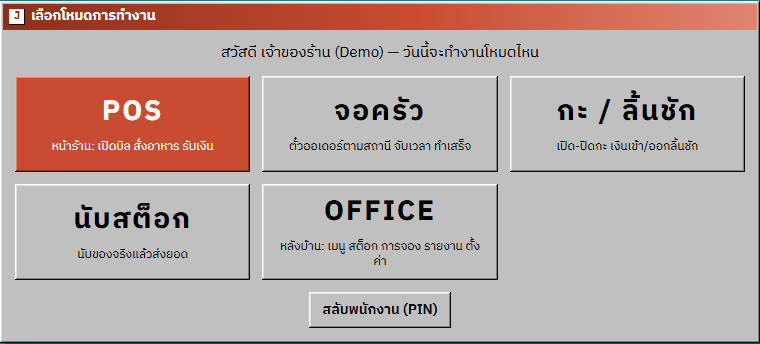
After the PIN, a role with more than one mode sees big tiles: POS, Kitchen, Shift / drawer, Stock count and OFFICE (the back office). Only modes the role is allowed and the shop's plan includes are shown.
A role with a single mode goes straight into it and never sees this screen. “Switch staff (PIN)” at the bottom lets someone else sign in instead.
Open full size The POS bar at the top
POS, Kitchen, Shift / drawer and Stock count open full screen under the POS bar: the POS logo (back to the POS home), the screen title · shop name, the language buttons (one TH/EN/MY cycle button on tablets and phones), the floor or counter button, the staff name and “Lock / switch”.
The “Modes” button goes back to the mode chooser; it shows only for a role with more than one mode.

Open full size Switching modes from the Office
On the Office taskbar, screens wider than 1024 px have one button per mode (POS · KDS · Shift · Count). Tablets and phones get one “Work modes” button that lists the role's modes.
A mode opened from there runs full screen under the POS bar. The same screen opened from a Room in the Office stays in the Room window.

Open full size
Signing out / switching person
The “⏏ Sign out / Switch” button
The Office taskbar tray shows “<name> · <role>” and a “⏏ Sign out / Switch” button. It signs that person out and returns to the PIN pad for the next person (on phones only the name and ⏏ show).
“Switch staff (PIN)” in the Menu and “Lock / switch” in the POS bar do the same. Use it every time you hand the device over, so everything is recorded under the person who really did it.

Open full size Log out of the shop, and auto-lock
Menu › “Log out of the shop” signs out and goes to the J-POS website. Use it when this device stops being used for the shop.
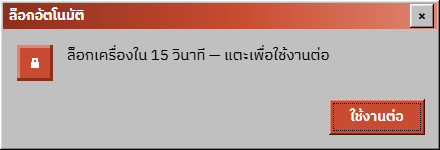
A device left idle for the set time (5 minutes by default) shows “Auto-lock” with a 15-second countdown. Press “Keep working” to carry on; otherwise it signs out like ⏏. The time is set on that device's Control Panel (see the “Shop settings” Book).
Open full size
Common points of confusion
“This device must be re-paired: owner login”
If the browser is no longer paired with the shop (for example after clearing browser data), the login page shows this and opens the email form. The owner logs in with email on that device once, and staff can use their PIN again.
Too many wrong PINs pause the device
5 wrong PINs within 60 seconds make that device wait 30 seconds, and each further pause doubles, up to 5 minutes. The message reads “พยายามเข้าระบบบ่อยเกินไป ลองใหม่ใน …s” (it is in Thai only).
A role without back-office access sees no OFFICE tile
The OFFICE tile needs the “Enter the back office (Office)” permission. A role without it works in the POS and the other modes it has, and is never taken into the Office after the PIN — see the “Permissions (RBAC)” Book.
The owner presses ⏏ and gets the PIN pad
After sign out / switch, a paired browser always opens on the PIN pad, even if the person who left had logged in with email. The owner presses “Shop owner? Log in with email” to come back with email, or uses their own PIN.
The sample shop for trying it out
“Try a sample shop” on the website opens a made-up shop that resets every night, with sample role buttons that sign in at once. Don't enter real data. If the browser is tied to a real shop, it asks “Switch to the sample shop?” first.